Microsoft SQL Server 2014 RTM (Release to Manufacturing) was released on 7th April 2014. There are different versions of SQL Server 2014 available such as Enterprise Edition, Enterprise Core Edition, Business Intelligence Edition, Standard Edition, Web Edition, Express and Developer Edition. You can download Microsoft SQL Server 2014 Evaluation Edition from the following link and you can download SQL Server 2014 Express Edition from the following link.
Important Note:- In this article we will take a look at how to install SQL Server 2014 on a Windows Server 2012 R2. However, the steps mentioned in this article can be followed while installing SQL Server 2014 on Windows Server 2008 R2 SP1 or later.
Software Prerequisites for SQL Server 2014
.Net Framework
Microsoft SQL Server 2014 requires .Net Framework 3.5 Service Pack 1 to be installed on the server. If you run Setup and you do not have .NET 3.5 SP1, SQL Server Setup will require you to download and install .NET 3.5 SP1 before you can continue with the SQL Server installation. Follow the link to download Microsoft .NET Framework 3.5 Service Pack 1
If you run Setup on a computer with Windows Server 2008 R2 SP1 or Windows 8, you must enable .NET Framework 3.5 SP1 before you install SQL Server 2014.
.NET 4.0 is a requirement for SQL Server 2014
Check the following link to know more about Hardware and Software Requirements for Installing SQL Server 2014.
Windows PowerShell
SQL Server 2014 does not install or enable Windows PowerShell 2.0; however Windows PowerShell 2.0 is an installation prerequisite for Database Engine components and SQL Server Management Studio. If Setup reports that Windows PowerShell 2.0 is not present, you can install or enable it by following the instructions on the Windows Management Framework page.
Installing SQL Server 2014 on Windows Server 2012 R2 SP1 Enterprise Edition
1. Database Administrator should log on to the server with administrative privileges and then right click Setup.EXE file and choose Run as administrator option from the drop down list.
2. Once Prerequisites are installed successfully the setup may ask you to restart the server. Once the server is up after the restart once again run the Setup.EXE file. Once the installation of all the prerequisites are completed successfully the SQL Server Installation Center will open up as shown in the snippet below. You need to navigate to the Options screen as shown in the snippet below to choose the appropriate Processor Type to specify the architecture of SQL Server 2014 to be installed.

3. In SQL Server Installation Center’s Installation Screen you need to choose New SQL Server stand-alone installation or add features to an existing installation option as highlighted to install a standalone instance of SQL Server 2014.

4. It will open up Setup Support Rules window which will identify problems that might occur when you install SQL Server Setup support files. You must correct the failures if there are any before the setup can continue. If there are no issues identified then click OK to continue with the installation.
5. In Product Key window of SQL Server 2014 Setup you can choose to Install SQL Server 2014 as an evaluation edition or else you can enter the Product Key to install the version specific to the Key. As like in SQL Server 2008, SQL Server 2008 R2, SQL Server 2012, SQL Server 2014 also has a single installation for all editions of SQL Server 2014. Once you have entered the Product Key or choose the free edition (Evaluation) then click Next to continue with the installation.
Important Note: If you are installing the Evaluation Edition then you can upgrade to another edition using the Edition Upgrade Wizard. Once upgraded from an Evaluation Edition to Enterprise, Standard, Business or Web Edition then you cannot downgrade it to a lower edition. In such a scenario you need to Uninstall SQL Server 2014 and install a fresh copy of the desired edition.

6. In the License Terms screen, you can go through the license agreement and then select the check boxes at the bottom of the screen to accept the license terms and conditions and then click Next to continue with the installation.

7. In Global Rules screen it will identify problems that might occur when you install SQL Server 2014 Setup support files. In case if there are any issues identified then you need to fix the same before continuing with the installation. If you want to avoid getting Windows Firewall error then, you can disable the windows firewall before the installation and enable the same once the installation is complete.

8. On the Product Updates page, the latest available SQL Server product updates are displayed. If there are no product updates discovered, then SQL Server Setup does not display this page and auto advance to the Install Setup Files page.
For more information on latest Cumulative Updates and Service Packs read SQL Server 2014 Build List / SQL Server 2014 Build Versions
9. On the Install Setup Files page, Setup provides the progress of downloading, extracting, and installing the Setup files. If there is any update for SQL Server Setup is found, and is specified to be included, that update will also be installed.

10. In Install Rules screen it will identify problems that might occur when you install SQL Server. In case if there are any issues identified then you need to fix the same before continuing with the installation. If you want to avoid getting Windows Firewall error then you can disable the windows firewall before the installation and enable the same once the installation is complete.

11. In Setup Role screen you can click the SQL server Feature Installation option to individually select which feature components to install or you can click a feature role to install a specific configuration. The different chooses available in this screen are:-
SQL Server Feature Installation: - Install SQL Server Database Engine Services, Analysis Services, Reporting Services, Integration Services and other features.
SQL Server PowerPivot for SharePoint: - Install PowerPivot for SharePoint on a new or existing SharePoint 2010 server to support PowerPivot data access in the farm. Optionally, add the SQL Server relational database engine to use as the new farm’s database server. If you choose this option then you can even Add SQL Server Database Relational Engine Services to this installation.
All Features With Defaults: - Install all features using default values for the services accounts.

In the above snippet you need to choose SQL Server Feature Installation option and click Next to continue with the installation.
12. In Feature Selection screen you need to choose the features which you would like to install. The different components which are available for installation with SQL Server 2014 are:-
Database Engine: - Includes the Database Engine, the core service for storing, processing and securing data. The Database Engine provides controlled access and rapid transaction processing and also provides rich support for sustaining high availability. The Database Engine also provides support for the utility control point in the SQL Server Utility. Only Database Engine Services and Analysis Services can be clustered.
SQL Server Replication: - Includes a set of technologies for copying and distributing data and database objects from one database to another and synchronizing between the databases for consistency. You can use replication to distribute data to different locations and to remote and mobile users over local and wide area networks, dial-up connections, wireless connections and the Internet.
Full Text and Semantic Extractions for Search: - Includes the Search engine that supports Full-Text Extraction for fast text search as well as Semantic Extraction for key phrases (likely tags) and similarity search on content stored in SQL Server.
Data Quality Service: -Includes Data quality database objects.
Analysis Services: - Includes Analysis Services and tools used to support online analytical processing (OLAP) and data mining. Only Database Engine Services and Analysis Services can be clustered.
Reporting Services: - Native: - Includes Reporting Services, a server-based application for creating, managing, and delivering reports to email, multiple file formats, and interactive Web-based formats. The Native mode server provides all processing and management functionality through Reporting Services components. Reporting Services cannot be clustered.
Shared Feature: - Each shared feature is installed once within a defined scope and operates within that scope. The defined scope can span all SQL Server versions on a computer (e.g., SQL Server Browser), can be isolated to one major version of SQL Server (e.g., SQL Server Management Tools), or can be isolated to one or more minor versions.
Reporting Service – Shared: - Includes Reporting Services, a server-based application for creating, managing, and delivering reports to email, multiple file formats, and interactive Web-based formats. SharePoint integrated mode integrates the report server with SharePoint products. The report viewing and report management experience are integrated with SharePoint sites and libraries. Reporting Services cannot be clustered.
Reporting Services Add in: - Includes management and user interface components to integrate a SharePoint product with an SSRS report server in SharePoint integrated mode. The add-in only needs to be installed on server running a SharePoint product.
Data Quality: - Includes Data quality client objects.
SQL Server Data Tools: - Installs the SQL server development environment, including the tool formerly named Business Intelligence Development Studio. Also installs the business intelligence tools and references to the web installers for database development tools.
Client Tools Connectivity: - Includes components for communication between clients and servers.
Integration Services: - Includes the designer, runtime, and utilities that enable Integration Services to move, integrate, and transform data between data stores.
Client Tools SDK: -Includes the software development kit containing resources for programmers.
Documentation Component: - Installs only the components that you use to view and manage the documentation for SQL Server 2012. By default, the Help Viewer component uses the online library. After installing SQL Server, you can use the Help Library Manager component to download documentation to your local computer.
Management Tool – Basic: - Includes Management Studio support for the Database Engine and SQL Server Express, SQL Server command-line utility (SQLCMD), SQL Server PowerShell provider, and Distributed Replay Administration Tool.
Management Tool – Complete: - Adds the following components to the basic management tools installation: Management Studio support for Reporting Services, Analysis Services, and Integration Services technologies, SQL Server Profiler, Database Tuning Advisor, and SQL Server Utility management.
Distributed Replay Controller: - Includes the Distributed Replay Controller which orchestrates the actions of the distributed replay clients.
Distributed Replay Client: - Includes the Distributed Replay Client. Multiple Distributed Replay Clients work together to simulate a workload against an instance of SQL Server.
SQL Client Connectivity SDK: - Includes SQL Server Native Client (ODBC / OLE DB) SDK for database application development.
Master Data Services: - Includes Master Data Services, the platform for integrating data from disparate systems across an organization into a single source of master data for accuracy and auditing purposes. Installs the Master Data Services Configuration Manager, assemblies, PowerShell snap-in, and folders and files for Web applications and services.
Redistributable Features: - SQL Server redistributable and shared features are installed when needed: Error and Usage Reporting, SQL Server Native Client, MSXML version 6.0, Sync Services for ADO.NET, and SQL Server Browser.

13. In Instance Configuration screen you need to specify the name and the instance ID for the instance of SQL Server and click Next to continue with the installation.
Instance ID — By default, the instance name is used as the Instance ID. This is used to identify installation directories and registry keys for your instance of SQL Server. This is the case for default instances and named instances. For a default instance, the instance name and instance ID would be MSSQLSERVER. To use a non-default instance ID, specify a different value for Instance ID text box.

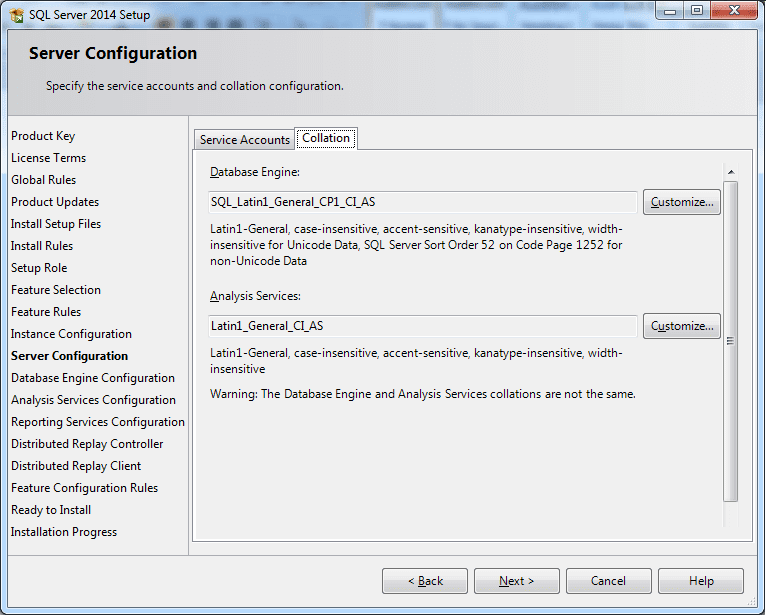
14. In Server Configuration screen you can specify the Service Account and the Collation. In the Service Accounts tab, you need to specify the Service Account under which SQL Server Services should be running. Here you can also specify the Startup Type for each of the SQL Server Services.

15. In the Collations tab, you can specify the collation for Database Engine and Analysis Services or else you can leave the default values as per the operating system. Click Next to continue with the installation screen.
16. In the Database Engine Configuration screen, you can specify authentication mode and administrators for the Database Engine, Data Directories and FILESTREAM.
In the Account Provisioning Tab you can specify the Authentication Mode. It is always a best practice to choose Mixed Mode (SQL Server and Windows Authentication). You can then specify the password for the SQL Server System Administrator (SA) account and also add Specify SQL Server Administrators.

17. In the Data Directories tab, you can specify the path of where user database data and log file should be stored. You can also specify the path where TempDB, Data and Log file should be stored. It is always a good practice to store TempDB, Data and Transactional Log file on different drives to improve performance. In this screen you can also specify the database backup directory as shown in the below snippet.

18. In the FILESTREAM tab, you can configure the FILESTREAM feature of SQL Server 2014. There are basically three different FILESTREAM configuration options such as:-
Enable FILESTREAM for Transact-SQL access
Enable FILESTREAM for file I/O streaming access; here you can specify the windows shared folder name
Allow remote clients to have streaming access to FILESTREAM data
19. In the Analysis Services Configuration screen you can specify the analysis services administrators and data directories. In the Account Provisioning tab you can specify which users have administrative permissions for Analysis Services.
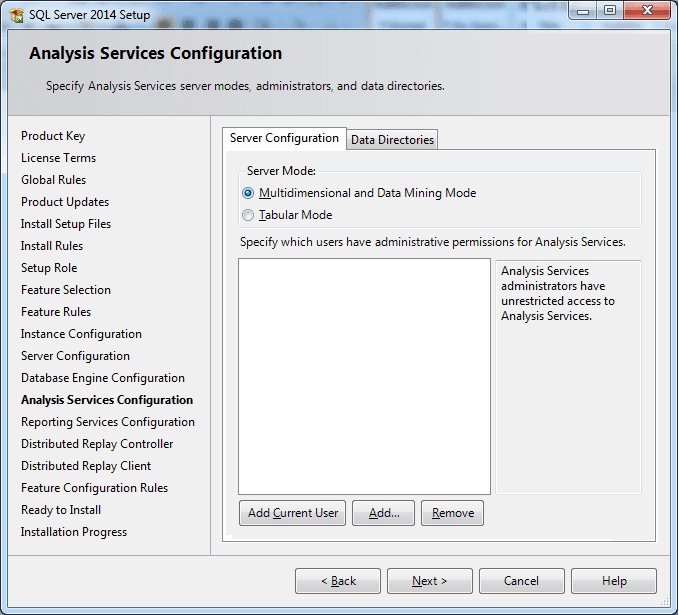
20. In the Data Directories tab, you can specify the Data directory, Log file directory, Temp directory and Backup Directory for analysis services. Click Next to continue with the installation.

21. In the Reporting Services Configuration screen there are three different choices available to specify the reporting services configuration mode.
Install and Configure: - Setup will install the report server and configure it in Native mode. The report server is operational after setup completes.
Install Only: - Installs the report server files. After installation, use Reporting Services Configuration Manager to configure the report server for native mode.
Reporting Services SharePoint Integration Mode
Install Only: - Installs the report serer files. After installation use SharePoint Central Administrator to complete the configuration. Verify the SQL Server Reporting Services service is started and create at least one SQL Server Reporting Services service application.
Choose the appropriate Reporting Service Configuration option and click Next to continue with the installation.

22. In the Distributed Replay Controller screen specify the users you want to grant administrative permissions to for the Distributed Replay client service. Users that have administrative permissions will have unlimited access to the Distributed Replay client service. Once the user is added successfully. Click Next to continue with the installation.

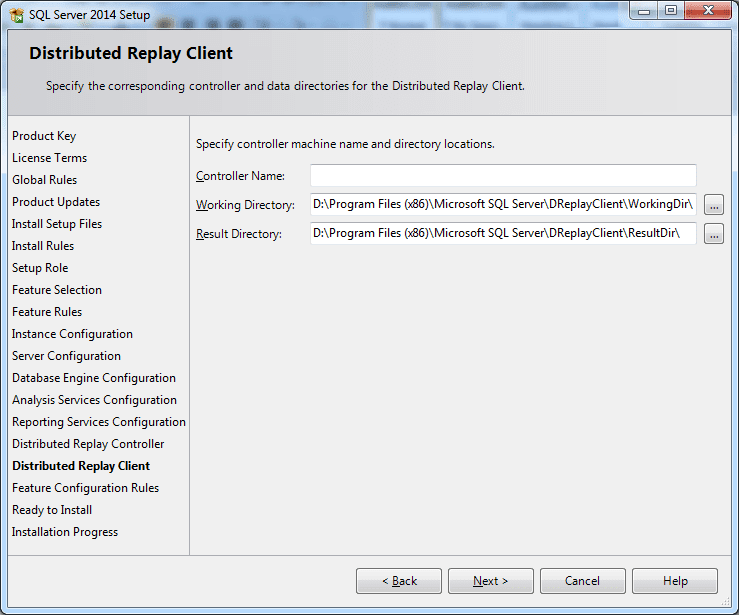
23. In Distributed Replay Client Configuration screen specify the Controller Name, Working Directory and Result Directory Locations. Use the Distributed Replay Client Configuration page to specify the users you want to grant administrative permissions to for the Distributed Replay client service. Users that have administrative permissions will have unlimited access to the Distributed Replay client service.
Controller Name: - This is an optional parameter, and the default value is <blank>. Enter the name of the controller that the client computer will communicate with for the Distributed Replay Client Service.
As per SQL Server Installation help: -
The name must be a fully qualified domain name (FQDN). For example, a host called server1 in the products hierarchy at Microsoft may have an FQDN of server1.products.microsoft.com.
If you have already set up a controller, enter the name of the controller while configuring each client.
If you have not yet set up a controller, you can leave the controller name blank. However, you must manually enter the controller name in the client configuration file.
Working Directory: - Specify the working directory for the Distributed Replay client service. The default working directory is <drive letter>:\Program Files\Microsoft SQL Server\DReplayClient\WorkingDir\
Result Directory: - Specify the result directory for the Distributed Replay client service. The default result directory is <drive letter>:\Program Files\Microsoft SQL Server\DReplayClient\ResultDir\
24. In Feature Configuration Rules screen the setup will run rules to determine if the installation process will be blocked. In case if there are any issues encountered then you need to fix the same before continuing with the installation.
25. In Ready to Install screen you can quickly review the features which you have selected so far for installation and then click the Install button to begin the Installation of SQL Server 2014.
SQL Server Configuration File:- SQL Server Setup provides the ability to generate a configuration file based upon the system default and run-time inputs. You can use the configuration file to deploy SQL Server throughout the enterprise with the same configuration. e.g.: C:\Program Files\Microsoft SQL Server\120\Setup Bootstrap\Log\20141122_214858\ConfigurationFile.ini

26. In Installation Progress screen you can monitor the progress of SQL Server 2014 installation. Click Next to see the Installation Summary.
27. In Complete Screen the location for the summary log file is mentioned. You can click on the link to review the SQL Server 2014 installation summary.

Không có nhận xét nào:
Đăng nhận xét